

Vegetable Sausage Rolls
2013-03-07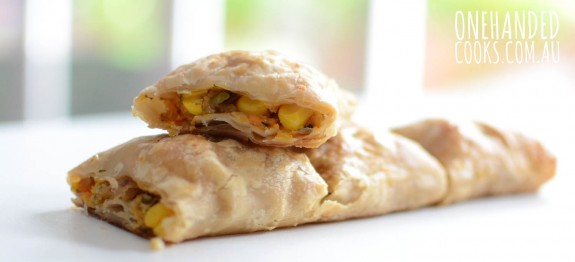


- Servings : 8
- Prep Time : 15m
- Cook Time : 30m
- Ready In : 45m
I recently went to my friend Ellen’s daughters birthday party in the park. She had a great spread of food, and I noticed all of it could be eaten by the kids of various ages and the adults. One of the highlights for both Harry and I were the vegetarian sausage rolls. Of course I asked for the recipe but my friend insists she just made them up with leftover veggies. Even better, I thought, and blog-worthy.
So this is my attempt at making vegetable sausage rolls with my typical fridge fodder. You can mix these up as much as you like to include all your family’s favourites.
These are lovely dipped in a nice homemade tomato sauce.
Nutrition Note: Making your own sausage rolls are easier than you think and a healthier, and often much tastier, alternative to store-bought.
Join us on Facebook for other foodie bits and pieces.
Ingredients
- 2 tbs olive oil
- 1/2 brown onion, finely chopped
- 1 cup diced/peeled sweet potato
- 1 cup diced/peeled potato
- 1 carrot, grated
- 1/3 cup frozen peas
- 1/3 cup fresh corn kernels
- Handful of finely chopped fresh herbs and a light sprinkle of spices (I used parsley, cumin & thyme)
- 2 sheets frozen ready-rolled puff pastry, partially thawed
- 1 tbs chia or sesame seeds
- 1 egg, lightly beaten
Method
Step 1
Preheat the oven to 180°C and line two baking trays with baking paper.
-
Step 2
Steam or boil sweet potato, potato, peas and corn until soft. Use a fork to roughly mash the mixture together. Set aside. -
Step 3
In a small fry pan heat 1 tsp olive oil. Add onion and carrot, lightly fry until soft. Set aside. -
Step 4
In a large bowl, combine herbs, onion and vegetable mash.
-
Step 5
Cut your pastry sheets in half. Spoon ¼ of the mixture evenly down the center of each pastry rectangle. Fold one edge of the pastry over the filling, stretching it slightly as you go. Fold the other pastry edge over the top to overlap and form a seam and press down gently to seal. Turn the roll over and place on the baking trays (seam side is down). -
Step 6
Half cut each roll into 4 or 5 segments and prick small holes in the top (because they burst otherwise and it's not pretty). Brush the tops with the egg, sprinkle with sesame or chia seeds and bake for around 30 minutes or until golden brown. -

Recipe Comments
Post A Comment


Average Member Rating
(3.9 / 5)
10 people rated this recipe
More Recipes
- Random
- Popular
- Recent
-

Banana Pancakes
(4.7 / 5)
-

Oreo Pops
(3.3 / 5)
-

Lion Cake
(5 / 5)
-

Banana Toast for Babies
(3.2 / 5)
-

Fruit, Oat & Chia Mini Chews
(4.2 / 5)
-

Banana Apple and Cinnamon Muffins
(3.7 / 5)


posted by Clare on July 20, 2013
These sound yummy, do you think they can be frozen prior to cooking or after??
posted by Allie on July 21, 2013
Hi Clare, I prefer to cook them first as defrosted frozen pastry doesn’t always work out so well (but I know people who think it’s OK). They are also best if you actually cut the rolls to desired lengths before freezing, rather than just scoring them. Last tip – defrost in the fridge completely before cooking otherwise the pastry may burn while the middle cooks. Good luck 🙂 Ax
posted by Melissa on January 21, 2014
Would they taste ok cold? I’m thinking of popping a batch in the freezer for lunches and then letting them defrost in their lunch boxes. There’s no heating facilities at our school.
posted by Allie on January 29, 2014
Hi Melissa, they wont be as good as hot but I have had them cold and they taste fine 🙂 Ax
posted by Rebecca on August 10, 2013
Huge success! We omitted onion and peas and added a grated zucchini. Also added a small amount of grated cheese. My 4 yr old and veggie scared 2 yr old couldn’t get enough of them even after he helped make them and knew what was in them. We always make our own sasage rolls which are a big hit but never though to do plain veggies before. Think my son actually preferred them cause they are softer. Thanks for the idea! Out of interest – we always just fold pastry over and leave a crimp down one side – a bit quicker and seems to stay together easier.
posted by Allie on August 10, 2013
Wooohooo, thanks for sharing with us Rebecca, we love a success story 🙂 Ax
posted by Cat on May 26, 2014
These were a huge hit (cold I might add) with my 11 month year old daughter who devoured 3!
posted by Annie on September 20, 2014
Hi, these sound great! Can u pls advise how long you reheat them for after they have defrosted? Thx!
posted by kellie on March 21, 2015
Thankyou for this recipe, my 2 year old son has a metabolic condition called PKU and has a very restricted diet when it comes to meat……So I am always on the look out for meat free meal ideas! Will be making these tomorrow.
posted by Samantha on March 23, 2015
Dad loved these for his lunch. Mum & Bub were left with 1 each. Will double the batch next time. Beautiful & easy!
posted by Michelle on June 26, 2024
I was looking for sausage rolls to make with not a lot and found these. I used my last sweet potato, a couple of potatoes, a tin of corn and a tin of peas and carrots as the veg. I threw in about 1/2 cup of grated cheese and a good sprinkling of salt. So yum!!! Thanks for inspiring me 🙌🙏🏼